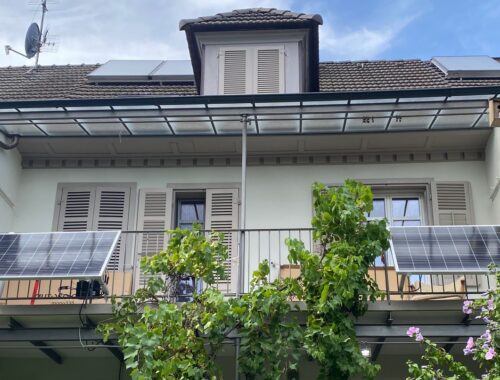
Project Solar Balcony/Balcon Power Plant/Plug&Play PV Plant
Actually, a photovoltaic (PV) system on the roof was planned this year. But since the city planning commission bombarded the project with restrictions and conditions to such an extent that the realization at cost/benefit level no longer has any economic viability, the project was temporarily put on hold. Of course, I hope that the provisions will be relaxed and that the plant can then be implemented in its original form in the coming years.
But since I would still like to cover a certain part of the electricity with a PV system, I have decided for a so-called Plug&Play solar system, or balcony power plant.
Such systems can be hung on a balcony railing without an installer, are plugged into a socket and then supply electricity to the apartment’s own circuit or from the house. The maximum feed-in is limited to 600Watt (Switzerland). This is then regulated by the corresponding inverter.
More detailed information for Switzerland can be found –> HERE
Offers for such facilities are like sand on the sea. In the end, I decided on an Autosolar plant. The set convinced me, as the panel fits exactly from the dimensions on the railing and the price is right for me.

I added the angle suspension and the 5m extension to mount the one panel. So the vine can remain in between.

After a simple ordering process, the delivery was also quick (the panels came separate courier, that had confused me at first). I then received the declaration of conformity for the notification to the energy supplier (IWB) by mail.
First it was the assembly of the panels. Instructions for the bracket are not included. But the concept opens up when looking at the pictures on the homepage. It’s not that complicated.
First mount the profiles and the suspensions on the panel, then attach the clamp to the other profile type and place it ready.
Then hang the panel on the railing and secure it with the long screw. And finally mount the profile with the clamp on it and then press the panel outwards and fasten it on both sides. No witchcraft.
If you want to avoid any color damage to the railings, it is best to underpin them with a rubber mat at all stopping points.


As soon as the panels are connected to the inverter and its connection is plugged into the socket, the inverter can be connected to the WLAN via an app. So you have an insight into the current yield, the total yield since commissioning and sees the production in the course of the sunlight. If you enter the electricity price in the app, the saving in francs is also displayed.

My panels point east. In nice weather I have direct sun on it between about 08:00 and 13:00 and in the second half of the day the diffuse light in the house shadow.
Unfortunately, I only installed the system in August. On Sundays in August, the yield was up to 1.4kwh per day. I am curious about the yield through the winter.
Targeted over the thumb, the yield over the year should end up at about 7% of the annual consumption. I was rather pessimistic. That would be the 100-120.- SFR savings. So the small plant would be amortized in almost 4 years.
For me, this fits for the first time. Of course, I still hope to relax the tree regulations accordingly in building protection zones and especially in the outskirts of the city, so that I can implement the roof-filling PV variant in the future. And in a form that is also in a reasonable cost/benefit ratio for me.
Das könnte Sie auch interessieren

Idea DIY Wild Bee Hotel